 PLEASE READ THE MANUAL AND GUIDE BELOW BEFORE TURNING ANYTHING ON
X-Arcade™ Machine Manual
The manual linked above provides an overview of how to setup and use your Machine, including pictures of how to install the Controller Tray and get everything up and running. The information below explains how to setup and use the PC, along with troubleshooting and other information that we update on a regular basis.
- The X-Arcade Machine is 73hx28dx32w (28” deep when it arrives with controller tray attached, you can remove the control panel by hand with the wingnuts shown here so it becomes 28dx32w and easily fits inside any door) and weighs 550lbs.
- The PC ships separately from the cabinet. We manually email cabinet tracking, while PC tracking is sent by our automated system.
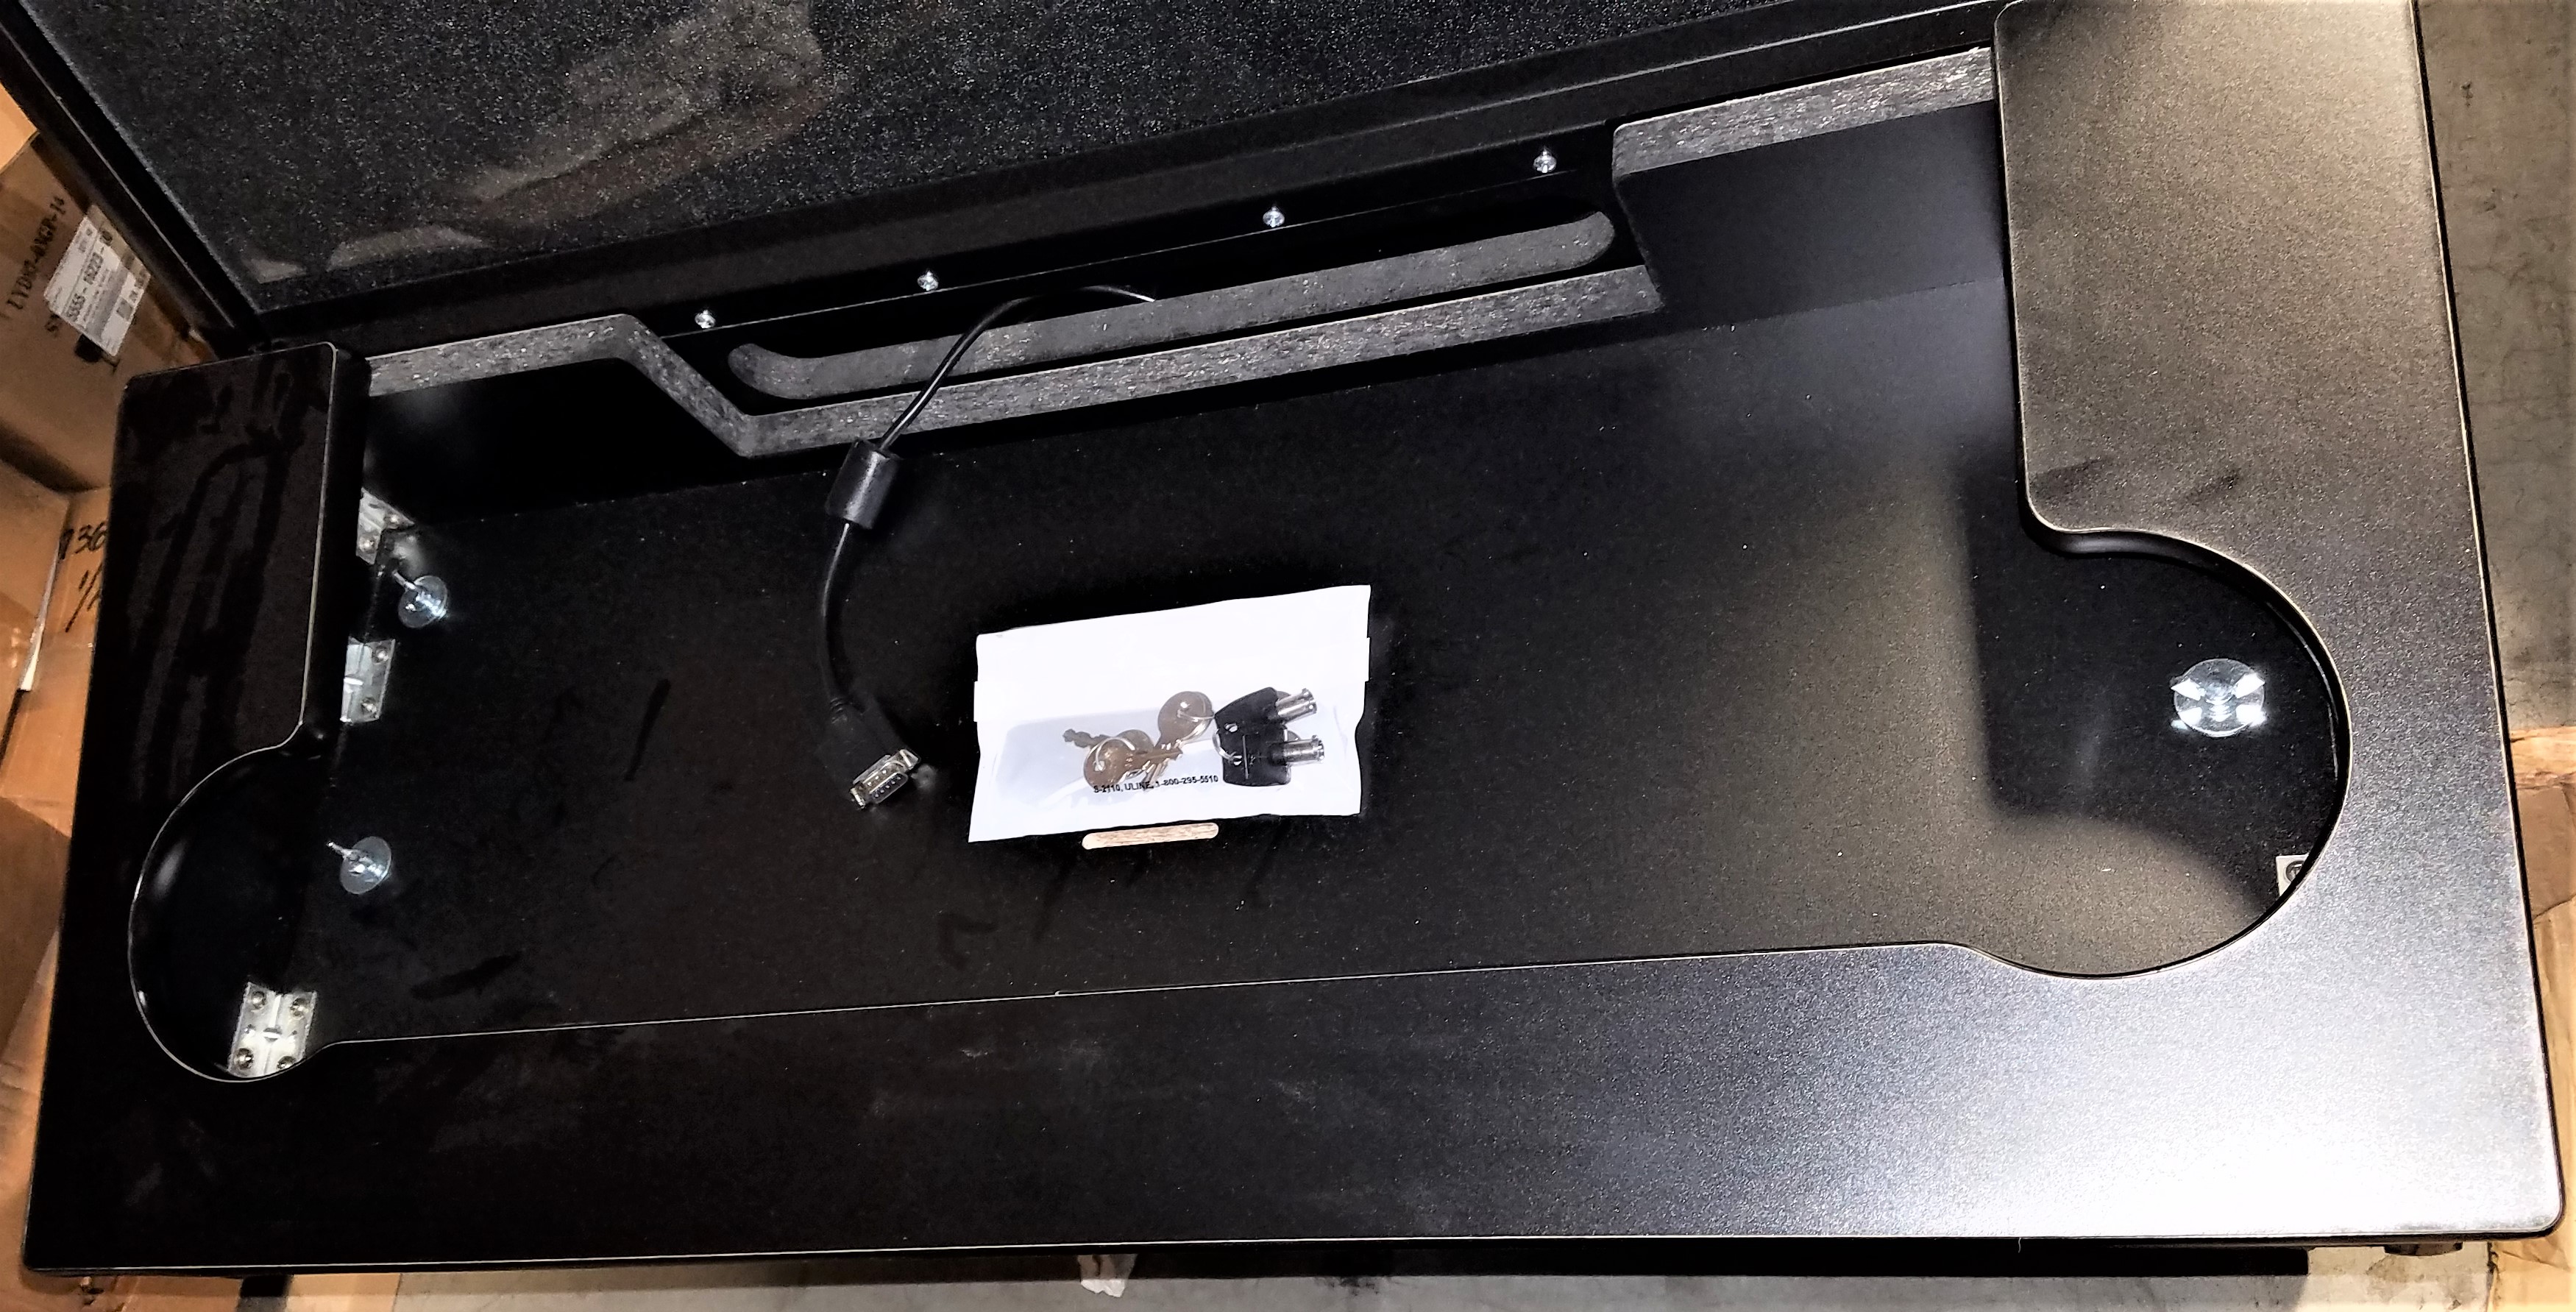
- The keys can be found in an envelope taped inside the storage compartment behind the marquee.
- The game discs are for backup purposes only and already loaded on the PC, you can simply store them inside the cabinet.
- You will be connecting a total of 4 USB cables to the PC, 2 power cords (one for the PC and one for the cabinet), and an audio cable. If your PC only has 3 USB ports on the back, there are 2 more on the front (behind a door on some models).
- The Purple and Green round PS/2 connectors are not used!
- The cables for the PC are bound with a wire tie and ready for hook-up, you can carefully cut/unscrew the wire tie to get the full length of the cables.
- The exhaust fan on the bottom-back of the cabinet is left unplugged on purpose, it is not needed for the electronics inside and it's LOUD. Leave it unplugged.
- The green/white cable is not needed (for connecting coin door only), simply store it in the cabinet.
- Ignore the X-Arcade Tankstick Manual (included in the Tankstick controller box) as it is for using the Tankstick by itself, not the X-Arcade Machine. Use the instructions on this page for your Machine instead.
WARNING: Do not turn off the Machine without first turning off the PC properly by simply tapping (do not hold) the power button on the front of the PC.
The PC is shipped separate from the Machine, here is how to get things up and running:

Initial Setup:
 Set the X-Arcade Tankstick controller on top of the tray as shown in the picture to the right (don't put it in the tray just yet).
- Connect the serial cable (which you will find in the hole behind the Tankstick tray) to the matching serial connection on the back of the Tankstick (shown in the picture to the right).
- Drop the other permanently attached USB cable from the back of the Tankstick (with green end for trackball) into the hole behind the Tankstick tray.
- Check to be sure the switch on the back of the Tankstick is in mode 1 (closest to the right side of the cabinet and the serial connection) and then set the Tankstick in place in the tray.
- Put the PC's keyboard and mouse into the drawer, and either:
A) FOR WIRELESS: Find the USB dongle inside of the mouse and plug it into the PC. Then put the keyboard and mouse in the drawer.
B) FOR WIRED: Run the USB connections for the keyboard, mouse, and trackball (the cable that you dropped at the end of step 3) down through the hole found behind the Drawer. You may also be able to reach this hole easier by opening the back panel. - Open the door and place the PC in the bottom-right section of the Machine, standing up. If your PC has a vent on the left side of the PC case, make sure that you leave enough room between it and the cabinet for the PC to ventilate (I.E. don't block any vents).
- Connect the 4 USB connections to the PC for (1) keyboard, (2) mouse, (3) Tankstick trackball and (4) USB for Tankstick buttons/joys (which comes from the Serial Switch Box and will already be found below, it has a purple connector on the same cable). If your PC only has 3 USB ports on the back, connect the USB connection with the green end (for trackball) into the front USB port of the PC instead.
- The audio and VGA video cables are already waiting near the PC. Connect the green/black headphone cable into the green headphone jack on the back of the PC (typically the center port), if the cable seems short you can run the cable directly from the subwoofer to the PC instead. Connect the blue VGA cable directly into the VGA port on the back of the PC. If your PC included an HDMI-VGA adapter connected to the PC, connect the VGA cable to it.
- The Serial Switch Box (labeled A/B/C/D) found in the drawer should be set to A. It can switch the CONTROLS between the PC (switched to A) and game consoles (more info on adding game consoles at the bottom of this page).
- Connect the power cable included in the PC box to the back of the PC and plug the other end into the power strip inside.
- Connect the other power cable between the cabinet and your wall socket, then turn on the power switch on the back of the cabinet as well as the power strip inside if needed. A surge protector is recommended which will also give you an easier way to power on/off the cabinet without having to get behind it.
- Turn on the PC, the very first boot will take a few minutes longer than subsequent ones while it scans the games for the first time.
Basic Operation:
IMPORTANT: If the light on the top-right of the control panel is not lit, it will not work. Try switching the Serial Switch Box from A to B, and then back to A again.
- To choose a game, first pick which system you want to play using the joystick or trackball, then press the Player 1 Start button (white button with 1 man). Use the joystick/trackball again to scroll the list of games and press Start again to start one.
- After you start an Arcade game (MAME menu games only), use the left pinball flipper button closest to you to insert coins, and then press the white Start button(s) to start the game. If a game only used 1 button, then it will always be button 1 closest to the joystick. If a game uses 2 buttons, then it will add button 2, and so on.
- To Exit a game, Press the red-lit Exit button, or alternatively HOLD the left pinball button closest to you and press the Player 1 Start button.
- Atari 2600 Games (see image): The Player 1 Start button acts like the Game Select button (usually used to change the game mode), the Player 2 start button acts like the Game Reset button which means the Player 2 Start button is the Start game button. So for 2-player games you would use Player 1 Start button to select a 2-player game mode, and then start the game with the Player 2 Start button. Button 1 is the only button needed to interact in the games once you've started.
- VOLUME: The sound adjustment control can be found in the back-left of the keyboard/mouse drawer, it is the primary way to adjust the sound. There is a green light on the control when it has power and is switched on, the volume power on/off switch is located on the front of it near the headphone jack. (See the Advanced Operation section below for other ways to adjust volume if needed.)
- When you are done playing, you can leave the cabinet running, or Tap (don't hold) the power button on the front of the PC and allow the PC to fully shut off. Then you can optionally turn off the main power on the back of the cabinet (or a power strip if you are using one). You can leave the main power on if you expect to play again in a few days, or power it off if you won't be playing again soon. See Advanced Power Options for other power options.
- See full list of other commands listed below.
Maximus Arcade GUI Button Layout:

| Function: | X-Arcade |
| Scroll Up | Joy Up |
| Scroll Down | Joy Down |
| Scroll Left | Joy Left |
| Scroll Right | Joy Right |
| Page Up | Joy Left |
| Page Down | Joy Right |
| Page Up Letter | Button 2 |
| Page Down Letter | Button 5 |
| Select | Start 1 or Button 1 |
| Previous Menu | Button 4 |
| Insert Coins (in arcade games only) | Left Pinball button (closest to you) |
| Start Game (after coins inserted) | Start 1 or Start 2 |
| Exit Game (return to Maximus) | Hold Left Pinball (closest to you) + Press Start 1 |
| Master Volume | There is a volume control in the drawer of the Machine. |
| Raise Volume* | Hold Start 2 + Joy1 Up |
| Lower Volume* | Hold Start 2 + Joy1 Down |
| Favorites* | Button 3, then press Select Button |
| Add Favorite* | Button 6 |
| CRT only: Refresh Video (outside of game) | Hold Start 2 + Press Start 1 |
| Put PC to sleep* | Hold Start 2 + Press Right Pinball (closest to you) |
| Reboot PC* | Hold Start 2 + Press Left Pinball (closest to you) |
![]()
*Disabled when in Presentation Mode.
Advanced Operation:
- SOUND: The primary way to adjust the sound is the sound adjustment in the keyboard drawer. While outside of a game (in any menu) you can also hold the Player 2 Start button and move the Player 1 joystick up and down to raise and lower the volume even more.
Alternative Volume control: If you need it to go louder still, go to options in Maximus by pressing Right Ctrl + P (hold Ctrl key on right-side of keyboard and press letter P key) while in a menu (not in game), then go to the Controller tab, then the Menus subtab. Next to Volume menu put in a value (for example the letter v). Save that when it asks (overwrite original), and now when in a menu press the v key to open the volume menu. You can press left and right on the arrow keys to adjust volume, v key again to close the menu.
For MAME games you can adjust the volume by pressing the ' key (key above Tab key normally) and adjust using left/right on the controller (press the ' key to exit volume adjustment menu). For some games (such as Rampage World Tour and Mortal Kombat games), the - and = keys can be used to raise or lower the in-game volume. - Dragon's Lair -, how to play: You only use the joystick and button 1.
- Screensaver and Sleep settings.
- Adding MAME™ Arcade Game ROMs
- Reassigning a Games Controls
- Q*Bert Controls
- For any games that say "Reset to Factory Defaults" or similar, simply hit the F2 button on your keyboard. You will only have to do this once.
- Advanced Power Options for X-Arcade Cabinets
- Adding a game console
- To delete the game save states and delete all of your games high scores, hold the Player 2 Start button (or 2 on your keyboard) and press End on your keyboard.
- Backup: If you wish to create a backup of your arcade software in case something should go wrong, you only need to back up the folder C:\Max 2.10\ to an external hard drive.
My Monitor Died And It's Past One Year For Warranty, What Do I Do?
The CRT monitor's used in the original production of the X-Arcade Machines were the last CRTs ever produced. There are no factories willing to produce CRT monitors anymore, so there are only a few options to replace the 27" CRT Monitor

1) The lowest cost option is 26" 4:3 Ratio Screen Here
2) If you have an X-Arcade Machine using a 32" LED Screen, this the official replacement from Wells Gardner. You may replace with a standard 32" computer monitor, just try and get clear measurements for alignment. If you get a consumer monitor, you'll save up to $400-500, but the screen will not have the industrial side brackets, so you'll have to rig up some connection yourself!
Troubleshooting
- FIRST - Check to be sure the switch on the back of the Tankstick is in mode 1 (closest to the right side of the cabinet and the serial connection). All kinds of issues arise when it is not in mode 1 because the button layout won't be correct.
- If the light on the Tankstick controller is not illuminated, the joysticks and buttons will not work. Make sure the A/B/C/D Serial Switch Box is set to A, the serial connection is connected firmly to the back of the Tankstick, and that the USB connection with purple end next to it is plugged into a USB port on the back of the PC. If you still don't get a light, try switching the Switch to B and then back to A. (if this continues to happen see solution here).
- Player 1 Start button is not working: Make sure Tankstick controller switch on the back is in Mode 1 (farthest right when facing the cabinet).
- The PC is rebooting or sleeping when trying to play: Notice the function list above has commands for rebooting the PC or putting it to sleep. Either you are pressing this combo, otherwise check again that the Tankstick controller switch on the back is in Mode 1 (farthest right when facing the cabinet).
- No sound: The sound adjustment control can be found in the back-left of the keyboard/mouse drawer, it is the primary way to adjust the sound. There is a green light on the control when it has power and is switched on, the power on/off switch is located on the front of it near the headphone jack. Make sure the power is plugged into the subwoofer in the rear and that the power switch is on. Also check to make sure you have the green audio cable plugged into the green audio port of the PC (typically the center port). If the sound jack is plugged in while the PC is on, you will need to reboot it before it will work. If you still have trouble, exit to Windows and make sure the PC is not muted.
- No Video or 'No Signal Input' Message (but sound is working): This indicates that no video signal is getting to the monitor, and if you are hearing sound then the PC is working as well. Check the VGA connection between the PC and monitor, try a new VGA cable if you still have trouble.
- Video is cut off at the top and bottom: While outside of a game only, hold the Player 2 Start button (or 2 on your keyboard) and press F2, and then try a game again.
- To test your controller, first run the game Dragon's Lair from the Daphne menu, hold the Player 2 Start button (or 2 on your keyboard) and press T on your keyboard. When done testing, press Escape on your keyboard to go back to the game software, then use the exit game button as usual to go back to the list of games. - Alternative method: Exit Maximus to Windows; while in the menus (not in a game) on the keyboard press Right Ctrl + Q (hold Ctrl key on right-side of keyboard and press letter Q key). The test program is on the desktop.
- Invalid Locations error message on boot.
- If you upgrade Windows (not recommended) you will need to reinstall the registry file to make Maximus boot with Windows. To do this, exit Maximus to Windows by holding Right Ctrl and pressing Q on the keyboard. Then you will need to go to the directory "C:\MAX 2.10\! Restore Default Prefs\" and run the file called "Registry Shell". You will also need to re-input the Maximus Registration code.
- If the game is being cut off at the top or bottom of the screen, simply use the monitor controls to adjust the screen size. The PCB for adjusting the monitor controls can be found in the keyboard/mouse drawer and it works like adjusting any PC monitor.
- Fan: The fan is meant for industrial use, can be loud, and is not necessary for your home arcade. So it is unplugged on arrival on purpose. If you want to enable/disable it, first make sure the cabinet is unplugged, then remove the clear plastic shroud and disconnect one of the connectors from the fan itself. Be sure to put the shroud back on before plugging it back in.
- Screen is flipping sideways or upside-down when I play?
- Over Specification Message (original CRT models only): When you first turn on the PC you will have an Over Specification message and no picture for a few minutes until the PC boots to our software. DO NOT power it off or hold the power button to shut it off during this process as it may be installing updates. Once fully booted, you may have a message saying Over Specification on top of your game menu, simply HOLD Start 2 (white button with 2 men on it) & press Start 1 (white button with 1 man on it) to refresh the video. You may have to do this a couple of times, but this is only needed if the message is stuck upon initial boot.
- No Power or complete power loss: Make sure the power switch on the back of the cabinet is on, as well as the power strip inside. In the AC Inlet on the back of the cabinet there is a fuse holder between the rocker switch and AC Inlet which houses 2x 250V 10A 20mm fuses in this one if which s a spare. Check the main fuse and replace it with the spare if needed. It's important to get a flat head that goes under the lip and that you bring it from the side as shown in these pictures. Also here is an image of how the wiring should be connected to the power inlet.
- Door Adjustment: If your cabinet door is rubbing or difficult to open/close you can adjust the hinges multiple ways to better align it. Here is a video explaining how to do so. It only takes a very small amount of adjustment.
- Dragon's Lair has sound but no video: First exit to Windows, then open C:\Max 2.10\Daphne\ folder and run DaphneLoader. Make sure Dragon's Lair is highlighted and click the 'Configure' button, go to the 'Video' tab and change the 'Screen Size' to 640x480 and press 'Apply'. Now reboot the PC and it will work properly.
- Scratches and wood repair
- Monitor Focus: If you are having any focus or color issue with your monitor, try the tips shown here, here is a picture of focus control.
- X-Arcade™ Tankstick Manual
- Marquees, Side Art, Overlays, etc.
- Troubleshooting video and audio problems, or an "Out of Range" message on your monitor.
- X-Arcade Coin Door Manual
Adding A Game Console
To add a game console to your Machine, you will need to purchase some other items. You will need to convert the video of each console from HDMI or AV/S-Video to VGA, along with the sound.
You will need the following to accomplish this:
- Console X-Adapter for whichever console you wish to use.
- If your cabinet did not include one, you will need a Serial Switch Box for switching between the PC and any consoles.
For a game console with HDMI output:
- An HDMI-VGA adapter with audio. Here is an example that we've tested that worked for us. For PlayStation 4 you will need to disable HDCP.
- A VGA Switch Box with audio. We've tested this 2 port one, but if you want to use more than one console these alternatives (but we've not tested these ones).
- 1x VGA Cable to connect the PC to the VGA Switch Box.
- 1x VGA cable for each console you add, to connect between the HDMI-VGA adapter and the VGA Switch Box.
- 1x Male to Male Stereo 3.5mm Audio Cable to connect the PC audio to the VGA Switch Box.
- 1x Male to Male Stereo 3.5mm Audio Cable to connect between the HDMI-VGA adapter and the VGA Switch Box.
- Be sure to set the console to the lowest resolution before connecting it into the cabinet.
For a game console with A/V or S-Video only:
- The Startech Video Game Jockey has been thoroughly tested and works great to switch the video/audio between a single PC and console. They are no longer in production however, so the cost is inflated for the remaining stock. The Mode button on the Video Game Jockey switches the video/audio between a console and the PC, when the light is on it is in console mode and off is PC mode. The S/C button changes between S-video and composite video, this should be set to s-video (button popped out). StarTech AVLink/Video Game Jockey VGA Box Manual
 - Spec Sheet
X-Adapter Controller Setup:
- There is already a spare serial cable inside of the cabinet (coming from C on the Serial Switch box) that you will finding loose inside the cabinet, not connected to anything. You will connect the X-Adapter to that cable and into your console. Information for using each adapter can be found on the X-Adapter Setup Pages here.
PS4 Note on CRT cabinets: You will want to hold the power button on the PS4 console to shut it all the way off. Next Press AND HOLD the power button until you hear a second beep (about 7-10 seconds) then let it go. Wait for the next screen and choose change resolution. The PS4 will need to restart again, choose 480p.
You must keep this email and your registration code. If you lose the code, we will not generate a new one or retrieve your old one. You are responsible for saving and storing this license code.
The Unlock code is case sensitive and it's recommended the three lines of the code be copied and pasted from this email into the three fields of the MA registration window, making sure there are no spaces at the front or end
If you haven’t already, download Maximus Arcade here.
It does not matter which email you use to register to download the software.
Instructions And Setup Documentation:
How To Use With X-Arcade Joysticks
Copy and paste your information below exactly as shown into Maximus Arcade when it asks for it with NO SPACES IN THE CODE OR EMAIL ADDRESS FIELDS (use 2.10 code):
Registration Code for v2.10:
NAME: code44934857842328345
EMAIL: registered@xgaming.com
CODE: 493F-94D5-DBAF-CB63
Note: You don't use your own email or name, this is unique for your purchase. If you lose this email or code, we will not send another one.